Leak Standards & Standard Conditions
Our two-point calibration process utilizes a pressure decay test with a leak standard. We use a leak standard (which we manufacture in-house) of which we know the flow rate at a given pressure—if we put a certain amount of pressure on one side of the leak standard, it will reliably allow air to seep through to atmospheric pressure at a certain rate. With this information, we can qualify the leak standard’s leak rate at what we call “standard conditions”: 20°C ambient temperature and barometric pressure equal to that at sea level. When we know the traceable leak rate of the leak standard, we can use that leak standard to calibrate a pressure decay leak test.
In a pressure decay test, a pressure transducer is used to measure the pressure drop in a test part; that pressure drop is then correlated into a flow rate based on the known pressure drop due to the leak standard. CTS’ leak standards are traceable to NIST standards. First, a leak-free master part is subjected to a standard pressure decay test as a control, measuring for normal pressure decay. Then, after a mandatory period of relax time (the test part is relaxing, not us—we’re always hard at work!), the same test is repeated, with one key difference: the leak standard valve on the test instrument manifold remains open, allowing the pressure in the test part to bleed out through the leak standard. This results in a larger pressure drop in the second test, as we are intentionally letting some of the pressure out.
We now know two pressure drop values: the control value (the expected pressure drop for every like part tested in the future), and the larger second value (with additional pressure loss from the leak standard). The difference in pressure drop values between the first test and the second is equal to the flow rate of the leak standard. If the two pressure loss values associated with the zero leak and the leak rate value of the leak standard were plotted on an X-Y graph—the horizontal X-axis representing flow rate and the vertical Y-axis showing the pressure drop—the line between the two points would be the calibration slope for the part being tested.
Using this calibration slope, we can calculate the flow or leak rate using the pressure loss of any other similar tested parts. Wherever the newly-tested part’s pressure loss falls on the calibration slope, the corresponding value on the X-axis is the part’s flow rate. This simple two-point calibration correlates pressure loss to flow rate. Once you know the measured pressure loss values, you can calculate the flow rate values. 
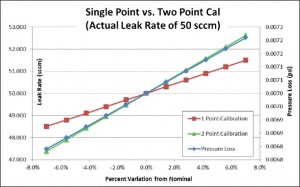
Example of two-point calibration graph showing correlation of pressure loss to flow rate.
Single-Point Calibration Flaws
Single-point calibration is insufficient for complex leak testing. If any aspect of the process change from test to test—even something as seemingly simple and innocuous as the test line length or the temperature of the tested parts—the results will be far less precise. Additionally, pressure drop values are not traceable the way the calibrated flow through a leak standard is. Using a leak spec with flow rate offers major advantages. Any time the volume of tested parts changes, a quick re-calibration via two test cycles (as described above) and any future test will have traceable leak values.Negative Leak Rates
If the pressure loss of a production part is less than the pressure loss observed during the first calibration cycle (the control test) on the leak-free master part, the pressure loss will correlate to a less than zero flow, or a negative leak rate. There are two likely causes of negative leak rates. First, the tested part may have greater volume than the master part. A part with a larger volume will experience less pressure loss than will a smaller-volume part with the same size hole/leak. The second, and much more likely scenario, is that the production part being tested is warmer than the master part during calibration.
When measuring pressure loss in test parts, the results are at least partially affected by the compression of air molecules and the resulting increased friction between them. This friction generates heat which creates a pressure spike at the end of the fill cycle. To combat this, tested parts should be given a period of “stabilizing time” after they’ve been filled, so that the pressure can stabilize before the test cycle begins. A master part during calibration and a production part may be at different temperatures for other reasons, as well. The master part may be kept in a specific location (on a shelf, in a cabinet, etc.) where it balances out at the ambient temperature. A production part may have just gone through any number of production processes—machining, gluing, ultrasonic welding, cleaning—that can raise its temperature.
Additionally, ambient conditions within a plant may change during the day. Certain temperature conditions during the calibration cycle that is cooler than temperature conditions during production testing may also cause negative leak rate measurements. How much these conditions affect your testing repeatability is dependent upon your reject rate criteria. If these conditions occur, contact CTS for in-depth discussions with our Application Specialists on how our instrumentation can be utilized correctly for your leak testing needs.
For more information on two-point calibration for leak test instruments and negative leak rates, contact Cincinnati Test Systems today. We are the leak test experts!

